Thursday, April 8, 2021
Jira next-gen - Open task in a new tab
Saturday, May 23, 2020
Automatically Dismiss Google Docs' "You're currently signed in as ..." Pop-up

I was. I wrote a Tampermonkey script to dismiss it automatically:
https://openuserjs.org/scripts/vshih/Google_Docs_-_dismiss_signed_in_as
Check it out. This issue was discussed on Google's Docs Editors Help, but the question has since been closed.
Tuesday, June 12, 2018
Imgur Numbering
Unless there's only one image, of course. That would be silly.
Get Imgur Numbering in the Chrome Web Store, and comment here if you have issues.
Sunday, September 4, 2011
CloudDiff Chrome Extension
CloudDiff - Compare versions of your Dropbox or pCloud text files in-browser or using your configured diff tool.
Updates
I've written CloudDiff, a Chrome extension which allows you to compare different versions of text files you have on Dropbox or pCloud. It can perform the diff in-browser, or trigger a diff tool you have installed on your local machine already, which you must configure.
- On the Dropbox website, browse to the "Version history" page of any text file.
- On the pCloud website, browse to the "Revisions" page of any text file.
- A "Diff" column has been added where you can select which two versions to compare.
- To trigger your already-installed diff tool, click the "Diff" button.
- If a diff tool is not yet configured, the Options page opens where you can specify one. If you don't have one installed already, one option is KDiff3. The setting is accessible from Tools > Extensions > CloudDiff > Options.
- An additional executable must be installed, CloudDiff Helper, in order to trigger your diff tool. Follow the instructions to install.
- If configured correctly, your diff tool should open.
- To perform the diff in-browser, click the "Inline" button.
Privacy Policy
Release History
2020-06-01 update (version 1.0.2.27) - Upgrade to jQuery 3.5.1, CodeMirror 5.54.0. Handle OAuth token expiration. Fix pCloud caching behavior.
2017-04-18 update (version 1.0.2.23) - Update to match latest Dropbox format change.
2017-03-13 update (versions 1.0.2.21-22) - Bug fix for diffing non-text files, and files larger than 4K; please get latest "CloudDiff Helper".
2017-01-26 update (version 1.0.2.20) - Implement "Ignore exit status" option.
2017-01-24 update (versions 1.0.2.17-19) - Updated installation instructions for Mac/Linux; bug fixes.
2017-01-21 update (version 1.0.2.16) - Support "Load older versions".
Thursday, September 1, 2011
Blame it on the Tron

View Larger Map
I live within 10 miles of Flynn's! We'll have to pay homage some time. Here's the wider shot.


The Messianic overtones of the movie were pretty interesting too — Flynn being the User/god, come to inhabit the world of programs in order to save them. I certainly didn't pick that up as an 8-year old. Then again, it's only these days that I spend any time wondering whether our reality is just a computer simulation.
Here's a bit of dialogue I liked quite a bit. Flynn has just revealed to Tron that he is actually a User, and not just a program, like the rest of them.
Tron: "If you are a User, then everything you've done has been according to a plan, right?
Flynn: "You wish! You guys know what it's like; you just keep doing what it looks like you're supposed to be doing, no matter how crazy it seems."
Tron: "That's the way it is with programs, yes..."
Flynn: "I hate to disappoint you pal, but most of the time that's the way it is for Users, too."
Tron: "Stranger and stranger."Wise words.
Sunday, July 10, 2011
Facebook Dis
That's what it feels like when I'm visiting different websites and I suddenly see:

"[various friends] like this."
The scary thing is that the stalker metaphor is quite appropriate – Facebook really is stalking you, keeping track of wherever you go whenever you see one of these.
So I really liked a Chrome extension called Facebook Disconnect. Unfortunately, it tends to break some sites (Scrabble, in particular). So I extended the extension to allow whitelisting certain sites.
Presenting: Facebook Dis.
If you really want to get fancy you can read the whitelist from a specific URL, say a website or public Dropbox file. This lets you to configure several installations of Facebook Dis in a single place; all instances will stay up to date automatically the next time you open your browser or click "refresh" from the options page.
Thanks to Brian Kennish for the original Facebook Disconnect.
Thursday, March 31, 2011
Fast Make for Vim
2014-05-18 update - This is now vim-make on GitHub.
I wasn't really satisfied with Vim's :make behavior so I wrote a script to do what I wanted.
- Saves buffer first
- If there are errors, show them in the quickfix window
- Success is reported in the status bar
- Saves some keystrokes, especially if mapped to
F5
~/.vim/plugin/Make.vim, or if you are using pathogen, ~/.vim/bundle/Make/plugin/Make.vim.This is basically my first Vim plugin so please let me know if there are things I could improve.
" File: Make.vim
" Author: Victor Shih <victor.shih@gmail.com>
" Last Change: 2/11/2019
" Version: 0.02
" WebPage: http://blog.vicshih.com/2011/03/fast-make-for-vim.html
" Description: Modestly enhanced `make` for Vim.
"
function! Make(args)
" Compile arguments.
let l:args = strlen(a:args) ? ' ' . a:args : ''
let l:title = expand('%') . ' - Make' . l:args
" Force write.
silent update!
" Find the closest directory to the current file with a [Mm]akefile.
let l:makefile_dir = s:find_makefile_dir()
" Move to that directory and make.
let l:out = split(system('cd ' . l:makefile_dir . ' && make' . l:args), "\n")
let l:len = len(l:out)
" Output to quickfix.
cgetexpr l:out
let w:quickfix_title = l:title
if g:Make_quickfix_always_open == 1 || l:len > 1
copen
cc 1
elseif l:len == 0
" No output; just report success.
cclose
redraw
echo l:title . ' succeeded'
else
" Output is a single line; echo it.
cclose
cc 1
redraw
echo l:out[0]
endif
endfunction
function s:find_makefile_dir()
let l:dir = expand('%:p:h')
while 1
" Ensure we have only one '/'.
if !empty(glob(substitute(l:dir, '/$', '', '') . '/[Mm]akefile'))
return l:dir
else
let l:parent = fnamemodify(l:dir, ':h')
if l:parent ==# l:dir
" We reached the root but didn't find a Makefile.
return '.'
endif
let l:dir = l:parent
endif
endwhile
endfunction
" Register command.
command! -nargs=? Make call Make("<args>")
let g:Make_quickfix_always_open = get(g:, 'Make_quickfix_always_open', '0')
let g:Make_loaded = 1
Monday, November 29, 2010
Ruby Autoflush
In Ruby, to flush currently buffered data just once, call
flush on the handle in question:STDOUT.flushsync attribute:STDOUT.sync = trueSunday, April 25, 2010
Keyboard Shortcuts for Facebook Photo Tagging
- Created an "ESP vision" for the Page URL
with the jQuery selectorfacebook.com/photo.php#photoactions>a[onclick],input[type="submit"]#photoactions>a:first-child,input[type="submit"] - Changed my "Shortcut to launch gleeBox" to ";"
This allows tagging to go as follows:
- Navigate to a Facebook photo album
- Press
;<ENTER>with left hand to enter tagging mode - Tag at will
- Press
;<ENTER>again to leave tagging mode - Left-click photo to move to the next photo
7/24/10 Update: Updated to skip new "Share" link.
Thursday, April 15, 2010
Mac Remote Desktop Connection Keyboard Shortcuts
Ctrl+Alt+Del, to a Windows box when you are connected using a Mac via Microsoft's Remote Desktop Connection, try Ctrl+Option+Delete (backspace).
Sunday, April 4, 2010
Edit "Save Password" Exceptions in Google Chrome for Mac OS X
http://www.google.com/support/chrome/bin/answer.py?hl=en&answer=156325
but I had trouble finding a solution for the Mac. A little snooping reveals that Chrome keeps its login information in a SQLite database file:
~/Library/Application Support/Google/Chrome/Default/Login Data- Shut down Chrome
- Probably a good idea to make a backup of the database file
- Open the database file in a SQLite database browser; I use SQLite Database Browser
- Select the "Browse Data" tab
- Sites for which "Never for this Site" has been selected will have the value
1for the columnblacklisted_by_user. Double-click the desired cell, change the value to0, and click "Apply Changes" - Save and close the database file
- Restart Chrome
Monday, April 27, 2009
Ubiquity - Bugmenot command
Bugmenot has a bookmarklet, but it opens a new window, and is therefore slow, and you have to copy and paste login information yourself.
Ubiquity is a command line interface to various things for Firefox.
I've created a Bugmenot command for Ubiquity.
Simply execute
bugmenot while viewing the desired login page, and the top-ranked Bugmenot entry will be populated and submitted.If that login has expired, you can specify an entry number as a parameter, from the list of entries in the Ubiquity preview pane.
Get it at http://gist.github.com/102363.

Some code was borrowed from Onur Yalazı and Brandon Goldsworthy.
7/9/09 update: Updated to support Ubiquity's Parser 2. The old code is still available here.
Friday, January 2, 2009
Fix for Firefox’s Password Exporter Add-on
1/8/09 Update: If you tried installing the .xpi and got “Firefox could not install the file at [...] because: Not a valid install package -207,” please see the revised download instructions below.
I like Firefox’s Password Exporter Add-on, but recently I noticed a bug with version 1.1 (released January 5, 2008) when importing into Firefox 3. Several entries return the following error:
'Can't add a login with both a httpRealm and formSubmitURL.' when calling method: [nsILoginManager::addLogin]
I’ve posted the .xpi at http://www.vicshih.com/files/password_exporter-1.1-fx_tb-formSubmitURL-fix.xpi (90.1KB).
Here’s the diff, in case you are queasy about installing my unsigned version.
Within the file
chrome/content/passwordexporter.jar, in the file content/pwdex-loginmanager.js,
540,541c540,549
<
<                 var bogusLoginInfo = new nsLoginInfo(entries[i].hostname, 'http://passwordexporter',
---
>     var doModify = false;
>
>     var formSubmitURL = entries[i].formSubmitURL;
>
>     if (formSubmitURL) {
>      formSubmitURL = '';
>      doModify = true;
>     }
>
>                 var bogusLoginInfo = new nsLoginInfo(entries[i].hostname, formSubmitURL,
548c556
<                     loginManager.modifyLogin(bogusLoginInfo, entries[i]);
---
>                     if (doModify) loginManager.modifyLogin(bogusLoginInfo, entries[i]);
Tuesday, November 4, 2008
Shortcut to Toggle Firefox Bookmarks Toolbar (like Chrome)
Ctrl+B. I hunted around for this ability in Firefox but it took a little finagling -- here's the how-to:- Install Keyconfig.
- Open Keyconfig's configuration dialog via "Tools | Keyconfig..." or
Ctrl+Shift+F12. - If you want to use
Ctrl+Bto toggle the Bookmarks Toolbar, first disable the default association to "Bookmarks" by selecting it and clicking the "Disable" button. - Click the "Add a new key" button and fill out the form using the following:
- Name:
Toggle Bookmarks Toolbar - Code:
var b = document.getElementById('PersonalToolbar');
b.collapsed = !b.collapsed;
- Name:
- Click "OK."
- Select your new key, select the text field, type your desired shortcut (
Ctrl+B, for example), and click "Apply."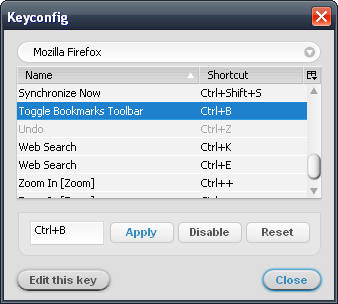


Another key I've added is a shortcut to toggle the status bar. Here's the code:
var s = document.getElementById('status-bar');
s.hidden = !s.hidden;
Enjoy!
Saturday, April 12, 2008
Todoist Sidebar - Firefox Add-On
 Note: please see the latest update.
I recently switched from Google Notebook to Todoist for my to-do lists. I'd searched a while for a list manager that could do hierarchical tasks, and Todoist looks like the only one that does, at least for free. It does hierarchical projects too, in fact.
One hack I saw on their site described a way to load Todoist into Firefox's sidebar, basically by bookmarking a simplified view of the site and checking "Load this bookmark in the sidebar." Nice!
My joy soon soured though, when I noticed that adding a task has the side-effect of loading the Todoist website into the main browser window, browsing over whatever site you already have in the current tab. Not so nice.
 Plus, I don't like the fact the button to open the sidebar (really just a bookmark) doesn't toggle -- to close the sidebar, you have to mouse all the way over to the sidebar's close button! Ridiculous! And though you can define a keyword for the bookmark which allows easy access through the address bar, there's no way to define a keyboard shortcut to hide the sidebar.
So, I put together a Firefox add-on which solves these problems, which I have creatively christened Todoist Sidebar.
Some perhaps non-obvious things to note:
- Left-click the toolbar button to toggle the Todoist sidebar.
- Middle-click the toolbar button to open Todoist in a new tab.
- The default keyboard shortcut is
Alt+Shift+2on Windows and Linux, andCmd+Shift+2on the Mac.
- The keyboard shortcut can be customized by modifying the string values
todoist-sidebar.keyandtodoist-sidebar.modifiersinabout:config, according to Mozilla's XUL:key specification. A Firefox restart is required for the changes to take effect. Setting either of these values to blank disables the keyboard shortcut.
 All of this will probably be moot once Google continues their world conquest by rolling out their Calendar tasks implementation. But hey, it will be fun while it lasts...
Right now the add-on is hosted in the Firefox add-on sandbox.
10/15/08 update: Okay, Amir, the creator of Todoist, contacted me a bit ago all the way from Denmark to collaborate on the Todoist Sidebar, and he has updated it and now maintains it on the Todoist website! He blogged about it at http://amix.dk/blog/viewEntry/19333. Please go there to install. Woohoo!
5/15/08 update: Hm, it seems to still exhibit the naughty toggle behavior described in the comments on initial install. Restarting Firefox makes the problem go away. I'll look into this at some point. Lame!
4/28/08 update: Version 1.0.2 fixes the previously mentioned bug where any key press triggers the sidebar. Also the default key accelerator is now
Alt+Shift+2 for Windows and Linux, and Cmd+Shift+2 for the Mac.4/26/08 update: Please note that currently there is a bug with the default installation where every key press toggles the sidebar (see comments). This is due to my incorrectly implementing the default shortcut key. Also, the intended default is a bit problematic because it tends to interfere with the Tools menu accelerator.
I plan to change the default to
Alt+Shift+2 (Cmd+Shift+2 on the Mac) when I get the chance. In the meantime, you can do this yourself by setting todoist-sidebar.key to "2" and todoist-sidebar.modifiers to "alt shift" for Windows/Linux or "accel shift" for the Mac in about:config.4/24/08 update: Please note that some users are experiencing behavior where every key they type (or some subset) toggles the sidebar (see comments). This may possibly be remedied by fiddling with the
todoist-sidebar.modifiers setting in about:config. Please be patient and I'll look into this shortly.
Tuesday, April 8, 2008
Move to Trash from the Mac Command Line
A while back I wrote this shell function to be able to move files to the trash from the command line on my Mac, rather than condemning them to oblivion with no chance of return. This is in my
.profile.It's a little hairy looking but it does the job. Note that it attempts to append names with a date stamp if a file/directory with that name already exists in the trash, just as the Finder does.
function del() {
  while [ -n "$1" ]; do
    if [ ! -e "$1" ]; then
      echo "'$1' not found; exiting"
      return
    fi

    local file=`basename -- "$1"`

    # Chop trailing '/' if there
    file=${file%/}

    local destination=''

    if [ -e "$HOME/.Trash/$file" ]; then
      # Extract file and extension
      local ext=`expr "$file" : ".*\(\.[^\.]*\)$"`
      local base=${file%$ext}

      # Add a space between base and timestamp
      test -n "$base" && base="$base "

      destination="/$base`date +%H-%M-%S`_$RANDOM$ext"
    fi

    echo "Moving '$1' to '$HOME/.Trash$destination'"
    \mv -i -- "$1" "$HOME/.Trash$destination" || return
    shift
  done
}

alias rm='del'
An interesting side-effect is thatrm <directory>works as well, which is a little uncanny because ordinarily either
rmdir <directory> (for an empty directory) or rm -rf is required.2/23/10 update: Handle case where rm options are mistakenly specified.
7/4/08 update: Fixed problem when removing file names containing spaces.
Friday, April 4, 2008
Create Firefox Multiple-Item Packages - maddon.py
I learned that the Mozilla framework supports Multiple-Item Packages -- multiple add-ons and/or themes grouped together in a single file. I've written a Python script which takes a list of add-ons and themes in any format I could think of and generates a multiple-item package for you -- maddon.py, for "multiple add-on." You can pass to it:
- local .xpi/jar files
- directories of .xpi/jar files
- text files, with each line containing a .xpi/jar file
- remote URLs
- websites which will get scraped for .xpi/jar files
I use the text file VicsAddons.txt to generate my personal add-on favorites:
# Download Statusbar
https://addons.mozilla.org/en-US/firefox/addon/26
# Google Browser Sync
http://tools.google.com/firefox/browsersync/install.html
# CustomizeGoogle
https://addons.mozilla.org/en-US/firefox/addon/743
# Better Gmail 2
http://lifehacker.com/software/exclusive-lifehacker-download/better-gmail-2-firefox-extension-for-new-gmail-320618.php
# Better GCal
http://lifehacker.com/software/exclusive-lifehacker-download/enhance-google-calendar-with-the-better-gcal-firefox-extension-260074.php
# Better GReader
http://lifehacker.com/software/exclusive-lifehacker-download/trick-out-google-reader-with-better-greader-262020.php
# Adblock
https://addons.mozilla.org/en-US/firefox/addon/10
# dragdropupload
https://addons.mozilla.org/en-US/firefox/addon/2190
# Firebug
http://getfirebug.com/
# Google Gears
http://dl.google.com/gears/current/gears-osx-opt.xpi
# PicLens
http://www.piclens.com/site/firefox/tutorial_pl_ff.php
Running it produces the following output:
$ maddon.py VicsAddons.txt
Parsing 'VicsAddons.txt'
Parsing 'https://addons.mozilla.org/en-US/firefox/addon/26'
Scanning page...
Downloading 'https://addons.mozilla.org/en-US/firefox/downloads/file/24860/download_statusbar-0.9.6.1-fx.xpi'
Adding 'download_statusbar-0.9.6.1-fx.xpi'
Parsing 'http://tools.google.com/firefox/browsersync/install.html'
Scanning page...
Downloading 'http://dl.google.com/firefox/google-browsersync.xpi'
  ...

Created 'VicsAddons.xpi' with the following files:
download_statusbar-0.9.6.1-fx.xpi
google-browsersync.xpi
customizegoogle-0.71-fx+sm.xpi
bettergmail2_0.3.4.xpi
bettergcal_0.2.2.xpi
bettergreader_0.2.2.xpi
adblock-0.5.3.043-fx+fl+mz+ns.xpi
dragdropupload-1.5.25-fx.xpi
firebug1.0-current.xpi
firebug-1.1.0b12.xpi
gears-osx-opt.xpi
piclens-mac-release-1.6.2.1659.xpi
install.rdf
I can then drag
VicsAddons.xpi to a Firefox window, and all add-ons and themes are installed in one fell swoop (restarting Firefox still required, unfortunately).Note that since Firebug has both its current and beta versions on the same web page,
maddon.py adds them both, which could be problematic. I could reference the exact desired .xpi version, but this loses the benefit of retrieving the latest version when run. Ah, trade-offs.Here is the help.
usage: maddon.py [options] <file_or_directory> [...]

Create a multiple-item XPI.  The <file_or_directory> argument(s) can be any of the following:

  .(xpi|jar) file - added directly to bundle
  URL, .webloc file
                  - if ends with '.(xpi|jar)', will be downloaded and add to bundle;
                    otherwise, the web page is scanned for links ending with '.(xpi|jar)'
  directory       - scanned for files satisfying any of the above requirements
  text file       - each line is scanned as if it were given as a parameter.  Lines beginning
                    with '"', '#', '!', or ':' are considered comments
Friday, March 28, 2008
Find Duplicate Files - dups.py
Without arguments,
dups.py checks the current directory, recursively:$ dups.pyThis has been tested on the Mac OS X and cygwin, and should also work with Python for Windows.
Duplicates found:
./Data/2004/05_4/015_12A.jpg
./Data/2004/2004.09.29 Grandma/015_12A.jpg
Duplicates found:
./Data/2002/19/uvs021219-008.jpg
./Data/2006/01_2/uvs040430-006.jpg
...
There are lots of nerdy options, like filtering by file size and following symbolic links. Try
dups.py -h to see them all:usage: dups.py [options] [<file_or_directory> ...]
Find duplicate files in the given path(s). Defaults to searching files recursively,
except for hidden files (beginning with "."), empty files, and symbolic links.
Options:
--version show program's version number and exit
-h, --help show this help message and exit
-v, --verbose verbose
Exclusion Options:
-f, --flat do not scan directories recursively
-g n, --greater-than=n
only scan files of size greater than n bytes
-l n, --less-than=n
only scan files of size less than n bytes
Inclusion Options:
-L, --follow-links follow symbolic links (warning: beware of infinite
loops)
-H, --hidden-files include hidden files
-z, --zero-files include empty files
Miscellaneous:
-D, --delete delete subsequent duplicates (files are scanned in
argument-list order)
-c, --create-rel-links
replace subsequent duplicates with relative links
(non-Windows only)
-C, --create-abs-links
same as "-c", but links are absolute
-s, --special-hidden
changes meaning of "hidden files" (-H) depending on
platform: cygwin - uses Windows file attributes
(warning: slow); win32 - files with names starting
with "." considered hidden
P.S. I hacked together a way to detect Windows hidden files from cygwin but it's ugly and slow.
4/6/08 update: I added the ability to delete duplicates (-D), and create relative (-c) or absolute (-C) symbolic links.
Saturday, March 1, 2008
Hacking Lite - Evading Coffee Shop Banners
Occasionally I like to bring my laptop to a nearby coffee shop to get some work done without all of the distractions of my apartment. My favorite place has been a Tanner's Coffee Company within walking distance of my place. It's a little noisy sometimes, and the food isn't the freshest, but the drinks are decent and I seem to get a lot done whenever I'm there.
Their wireless offering injects an ad banner at the top of every page. This alone would not be prohibitively annoying since adblock successfully strips the ads, leaving only the banner, but what does tend to dampen the customer experience is that it breaks some sites, Google Reader in particular. Because of this, I started to do a little tinkering...
I figured they didn't inject all internet traffic, since I'm able to ssh without problems. Maybe they detect requests to servers at port 80? I toyed with the idea of using a local proxy server, blah blah blah...
Turns out, they actually filter on the user agent field within HTTP requests! This means that if you're using Firefox or Safari (or, I imagine, Internet Explorer), the banner will be injected; Opera, however, is ad-free. This also means that simply changing the user agent field that your browser declares in its HTTP requests sets you (ad) free as well.
In Firefox there are a number of ways to do this: install a Firefox extension, or simply add a string value to
about:config named:general.useragent.overridewith a value like
Opera/9.26 (Macintosh; Intel Mac OS X; U; en)as described here. It's probably a good idea to stick with a realistic user agent string as opposed to something arbitrary, since websites like Gmail may switch to less functional versions if they don't recognize your browser.
A quick way to determine your browser's user agent is javascript:document.write(navigator.userAgent).
The service responsible for the ads at this particular Tanner's (I think they're all independently owned) seems to be a company named AnchorFree. Chances are, this technique could work for ad-injection schemes used by other wi-fi spots.
Done and done. Back to high-quality coffee shop web surfing!
5/1/08 update: Okay, I'm dumb. A much easier way to do this is to add the filter
*.anchorfree.*
in AdBlock Plus. This solves the problem much more elegantly and doesn't run into issues with sites not supporting your supposed user agent.
Tuesday, February 5, 2008
Navigate Gmail Using Your Apple Remote
When I first got my Mac, I was really impressed with Front Row and how easy it was to manage all of my media with an interface as sparse and simple as the Apple Remote. Yet, there was one thing that left me wanting -- "If only I could use it to check my email," I thought wistfully. "I'd never leave my couch!"
Finally, my ambition for laziness can now satisfied! Though lacks the shiny polish of Front Row, an application called iRed Lite allows mere mortals to customize the behavior of the Apple Remote. I've written what's called a "layer" in the iRed Lite parlance, which is basically a set of actions tailored for a specific application.
If this is something you're interested in trying out, a couple of caveats about my solution:
- It assumes you are running Firefox.
- It assumes you are always logged into Gmail (by checking "Remember me on this computer" at login).
- So far it seems that iRed Lite cannot save an entire layer at once; each action must be saved as a separate script. I've created an archive called iRedLite_Gmail.zip consisting of actions which I map in the following manner:
| Open - browse to Gmail | double-click play |
| Open conversation (o) | play |
| Back to conversation list (u) | left |
| Star conversation (s) | hold play |
| Previous conversation (k) | up |
| Next conversation (j) | down |
| Previous message (p) | right |
| Scroll down | double-click down |
| Scroll up | double-click up |
| Increase text size (cmd-=) | double-click right |
| Decrease text size (cmd--) | double-click left |
Of course you can easily remap them any way you wish. Beware that iRed Lite tends to crash here and there, though -- save early, save often.
To recap, first download and install iRed Lite. Then download and unzip iRedLite_Gmail.zip, create a new layer and import the actions defined in each file in the archive.
3/15/08 update: Thanks everyone for your comments! To summarize:
- My actions have been grouped into one file here.
- You need to enable keyboard shortcuts in your Gmail Settings for this to work.
- This doesn't play well with Firefox Beta 3; I'll do what I can to tinker with this:
- You'll need to change the "increase font size" shortcut to send "cmd-+" instead of "cmd-=".
- "Open Gmail" doesn't work.
I will work on a Google Reader version at some point. I will incorporate everyone's suggestions and post updates here.
